Slicer Settings are used to configure the default behavior of the slicer and define which elements are presented in the slicer. For example, you could limit your Country slicer to European countries only in the slicer settings elements.
You change Slicer Settings only after you have added an existing slicer to your publication that was created in Discover, or built a new slicer using the Advanced Slicer wizard or New Slicer toolbox option.
Edit Slicer Settings
Process Overview
With the Interaction Manager open at the bottom of the page:
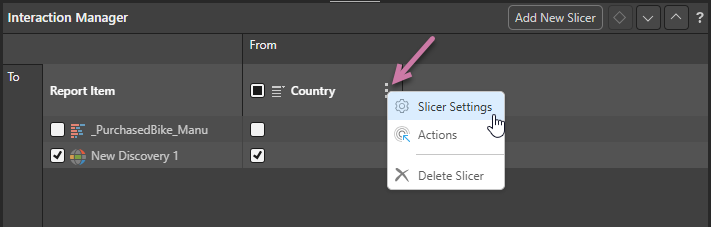
- Click the context menu alongside your slicer (purple arrow below) and select Slicer Settings:
- Specify the settings for your slicer using the options in the Slicer Settings panel. The editable settings are:
- Type
- Other Settings
- Elements
- Non Empty Filter
- Once you have set all your options, click Apply to save your changes.
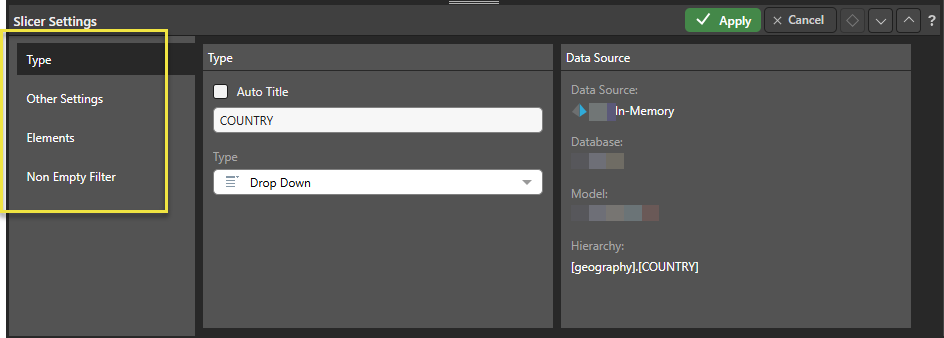
The Slicer Settings panel opens at the bottom of the page.
You can move between the pages of settings by clicking the tabs along the left-hand side of the panel (yellow highlight below).
Your slicer is updated with your changes.
Slicer Settings panel
Type
Auto Title
Select the Auto Title checkbox to disable the Title field and use the default name of the item as the title for your slicer:
- If the slicer is based on a hierarchy, this is the hierarchy name.
- If the slicer is based on a parameter, it is the parameter name as it appears in Content Manager.
Clear the Auto Title checkbox to enable the Title field, where you can type your own custom title for the slicer.
A new slicer's title defaults to the name of its underlying hierarchy or parameter. You can override this value manually or enable Auto Title in the Slicer Settings to keep the slicer's title automatically in sync with changes to the hierarchy or parameter name. This example shows how the name of a slicer appears throughout its lifecycle.
Adding the Parameter to the canvas (through its Formula) creates a slicer with a name that matches the parameter name:

If I change the value in the Slicer Settings Title field, the slicer name is overwritten with a custom name; in this case Gross Values:

If, instead of typing a new title, I selected the Auto Title checkbox in the Slicer Settings, the slicer title would be returned to its initial parameter name. However, now, if I were to rename the parameter, the slicer would be automatically updated to reflect the parameter's new name:

Tip: For more information about creating and using Binary parameters, as seen in this example, see Binary Parameters in Formulate.
Type
Change the slicer's type. Keep in mind that slicers are not displayed on the canvas in Publish, they filter visuals and so on in printed publication. If you choose a multi-select slicer type, your set of selections will be combined when filtering the target visual. This differs from multi mode, where separate visuals are created for each selection. The following options are available:
- Drop Down: Adds a dropdown list that you can select one slice from.
- Multi Select Drop Down: Adds a dropdown list that you can select multiple slices from.
- Single Select Tree: Supports 'regular' hierarchies in both cube and SQL models. Adds a single-select tree, which you can navigate through to find the relevant element.
- Multi Select Tree: Supports 'regular' hierarchies in both cube and SQL models. Adds a multi-select tree, which you can navigate through to find and select relevant elements.
- Date Calendar: This calendar tool is a specialized slicer visualization designed to make it easier to use date-time hierarchies and their associated calculations. There must be an instance of a Calendar Type slicer in the publication for this option to be available in the Slicer Settings.
Date-Time Pickers are only supported for SQL models. This functionality is not currently supported for MS OLAP, Tabular, or SAP BW.
Other Settings
The Other Settings tab is only shown where your model includes translations:

Language
For models that include translations, the Language dropdown list can be used to choose the language for the slicer. You can allow the language to differ for different users (by application language) or you can enforce a particular "fixed" language:
- Application Language: Use the language of the Pyramid application for the current user (falls back to default if the language is unavailable).
- Model Default Language: Use the model's default language as defined in the data source.
- Fixed: Use a specific language that is explicitly supported by the model.
Fixed Language
If you select to use a Fixed language, you can select from the languages on the model using the second dropdown list.
Elements
Select those elements that should be included on the slicer when the document is being published. As an example, if you have a Country slicer, you might want to limit the selectable elements to those countries in a particular region so that it is easy for your document designer to publish documents for all countries in their region without having to select from many irrelevant countries.
When configuring the elements on your slicer, you may see different options on the Elements panel:
- If your slicer is linked to a visual in Discover, you will see the Linked Discovery view.
- If your slicer is a "one-off" that only exists here, you will see the Unlinked Discovery view.
Linked Discovery
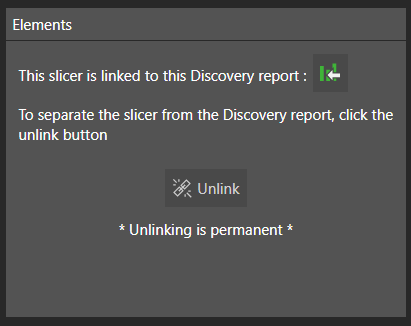
If your slicer was created in Discover, and has not been unlinked, you will see the following in the Elements panel:
You need to make a choice about where to make your changes:
- If you want the changes to your slicer's elements to impact the original slicer and any other presentations or publications that it currently appears in, click Linked Discovery to open the visual in Discover and edit the Slicer Settings elements in there. Any changes you make will apply to all instances of the slicer.
- If you only want to make changes to the slicer here, and you are happy to lose the connection between the instances of the slicer, click Unlink to break the link between your slicer and the linked discovery. Breaking this link means that the slicer is no longer connected to / affected by changes to the slicer in Discover. Once the slicer is unlinked, the Unlinked Discovery view is shown.
Warning: Unlinking a slicer from its discovery is permanent. Any changes you make to the discovery after it has been unlinked will not affect this slicer. You must be sure that you want to unlink your slicer before you click Unlink.
Unlinked Discovery
If your slicer is a "one-off" that only exists here (it is not linked to a discovery), then your changes only impact the slicer here. This is the case where the slicer was created on the fly or where it has already been "unlinked" from its discovery as described above.
Where the slicer is a "one-off," the Elements panel appears as follows:
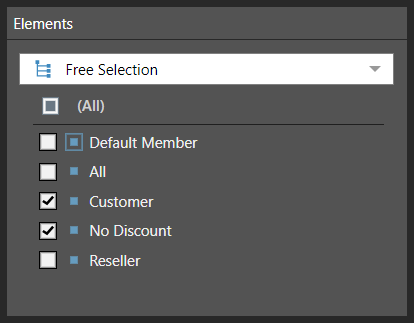
Choose the hierarchy elements that will be included in the slicer. There are three ways to determine the slicer's elements:
- Free Selection: Select the elements that you want to include on the slicer. You can select individual elements or all elements from the hierarchy using the checkboxes at the top of the panel, or you can navigate to and select a formulation from the tree to include its items. When individual elements and formulations are selected together, they are combined into a single list. Where the same item appears in both lists, the element only appears once in the final selection.
- Level: This option is relevant when working with OLAP or Tabular hierarchies, or regular SQL hierarchies. When creating a slicer based on a regular hierarchy, select this option to specify a particular level of the given hierarchy.
- Lists: Choose this option to use a custom list as the slicer.
Non Empty Filter
Go to the Non Empty Filter tab to hide empties from the slicer. For more information, see Empties Logic in the Discover help.